Hello. I am zm soft and I registered as a developer last year (end of ’23) and started releasing apps. We are also planning to release an app for developers to cooperate with each other to get through the closed test, if you would like to check it out.
Have you implemented in-app purchases? As an app developer, the best thing you can do is to satisfy users and receive payment for it, and I think this is the moment when all the hard work of development is rewarded. This time, I would like to write about how to achieve this.
What are in-app purchases in the first place?
As you probably know, in-app purchases fall into two categories.
- In-app products
- Subscriptions
Both of these systems take the form of accessing pre-set items in the Play Store via the Google Play Billing Library and paying a percentage of the consideration received to Google as a commission. Both are similar in implementation, but there are some unique caveats for subscriptions. I will explain the precautions based on my own experience.
Play Console Settings
Register an item
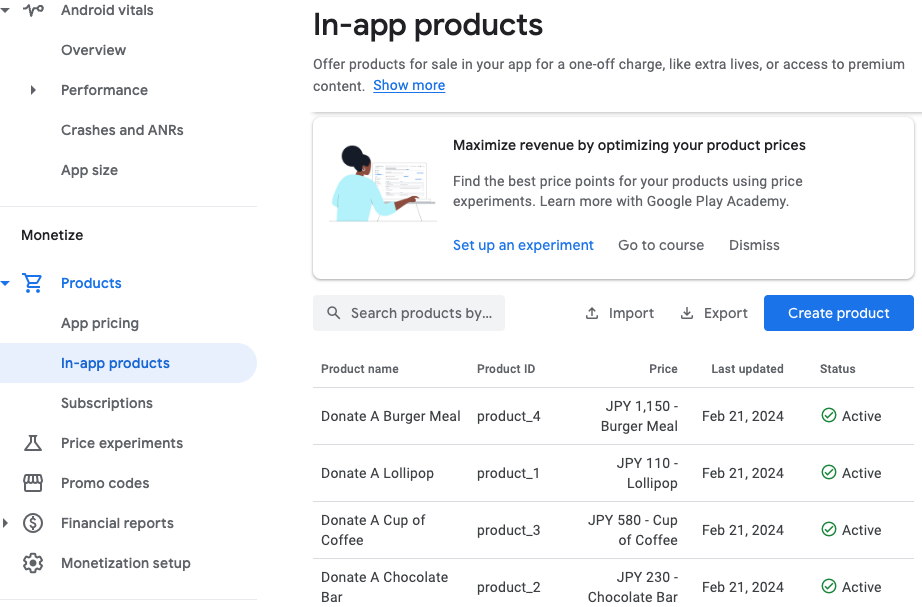
First, please register the item, as it cannot be displayed without it. You can change the price, name, etc. later, including whether or not you will actually use the item, so you may use it as you see fit. However, you cannot change only the ID, so if you are thinking of using an item created for testing in the production environment by changing its registration as it is, please add [product_1,2,3…] and [sub_1,2,3…]. and [sub_1,2,3…]. It is a good idea to register with an ID that can be used repeatedly, such as [product_1,2,3…] or [sub_1,2,3…]. In-app products and subscriptions are consumption type items and subscription type items, respectively. Each item can be registered by clicking on the “Create xx” button.
Basically, all you have to do is follow the input screen, but what was confusing was the price setting for subscription items. I couldn’t figure out how to set prices for all regions at once. I thought I would have to enter each region individually, but all I had to do was go to [Set prices]-[Country / region]-[Set price].
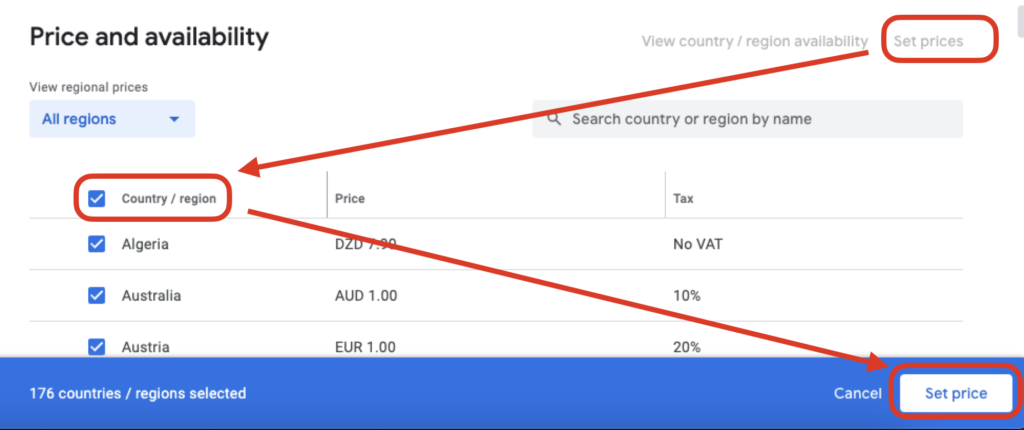
Push the Button, the following dialog box will appear and you can set the batch.

Register for a test account
Next, register a test account. Please note that if you are billed for a test without registering, you will actually be charged for the test. Registration for a test account is done by subscribing to a mailing list. If you are a user on that mailing list, you will be able to make payments from your test card information.Registration can be done by setting [Settings]-[License testing] on the first screen (developer screen) after logging into PlayConsole, note that this is not the PlayConslole app settings screen.

When a user registers on the mailing list and goes through the application purchase process, the billing information is displayed as a “test card,” allowing the user to test the application without actually paying for it.
Coding
The following work is required on the application side implementation.
- Importing Libraries
- Connecting to the store and retrieving item information
- Implementing the item display screen
- Requesting a purchase
- Processing when purchase is completed
Each is described in detail below.
Importing Libraries
The following are required to import the library.
- Fixing build.gradle
- Fixing android.manifest
An example of modifying build.gradle is shown below.
dependencies {
    implementation "com.android.billingclient:6.0.0"
}
manifestの修正例は以下です。
<manifest xmlns:android="http://schemas.android.com/apk/res/android"
    xmlns:tools="http://schemas.android.com/tools">

    <uses-permission android:name="com.android.vending.BILLING" />

    <application
バージョン等は公式文書をご確認ください。
Connecting to the store and retrieving item information
You can initialize BillingClient and startConnection to communicate with the store. queryProductDetailsAsync can be used to obtain information about each item. For more information, please check the official documentation. In my case, for some reason, batch retrieval did not work well, so I retrieved a list of items and then used queryProductDetailAsync to retrieve the details of each item individually. You can tell if the retrieved item (SKU) is a consumption type or a subscription type by its type: inapp or subs.
Implementation of item display screen
Once the information on an item is obtained, the information is listed so that the user can choose to purchase it. The screen itself is simply displayed according to the results of the retrieval. However, there is a caveat here when dealing with subscription-type items: the Subscription Policy needs to be addressed, and in my case, the app update was rejected for the following two reasons in a row.
- Incomplete localization of prices and conditions
- Incomplete description of offer conditions
First, I would like to address the incomplete localization of prices and terms. The reason was the display of the time period (e.g. $10/month). The “month” part is not translated when the app is run in a regional setting for a language that does not support multilingualization. Therefore, there is no need to translate the information in the application. On the other hand, the time period information is notified in ISO8601 format, such as P1M, which must be translated by the app. The following conversion process for each language has been added to the app.
fun formatBillingPeriod(billingPeriod: String, languageCode: String): String {
return when(languageCode) {
"en" -> {
when (billingPeriod) {
"P1W" -> "weekly"
"P1M" -> "monthly"
"P3M" -> "every 3 months"
"P6M" -> "every 6 months"
"P1Y" -> "annually"
else -> "unknown"
}
}
"ja" -> {
when (billingPeriod) {
"P1W" -> "週間"
"P1M" -> "月額"
"P3M" -> "3ヶ月ごと"
"P6M" -> "6ヶ月ごと"
"P1Y" -> "年額"
else -> "不明"
}
}
"fr" -> {
when (billingPeriod) {
"P1W" -> "hebdomadaire"
"P1M" -> "mensuel"
"P3M" -> "tous les 3 mois"
"P6M" -> "tous les 6 mois"
"P1Y" -> "annuel"
else -> "inconnu"
}
}
"es" -> {
when (billingPeriod) {
"P1W" -> "semanal"
"P1M" -> "mensual"
"P3M" -> "cada 3 meses"
"P6M" -> "cada 6 meses"
"P1Y" -> "anual"
else -> "desconocido"
}
}
"de" -> {
when (billingPeriod) {
"P1W" -> "wöchentlich"
"P1M" -> "monatlich"
"P3M" -> "alle 3 Monate"
"P6M" -> "alle 6 Monate"
"P1Y" -> "jährlich"
else -> "unbekannt"
}
}
else -> "unknown"
}
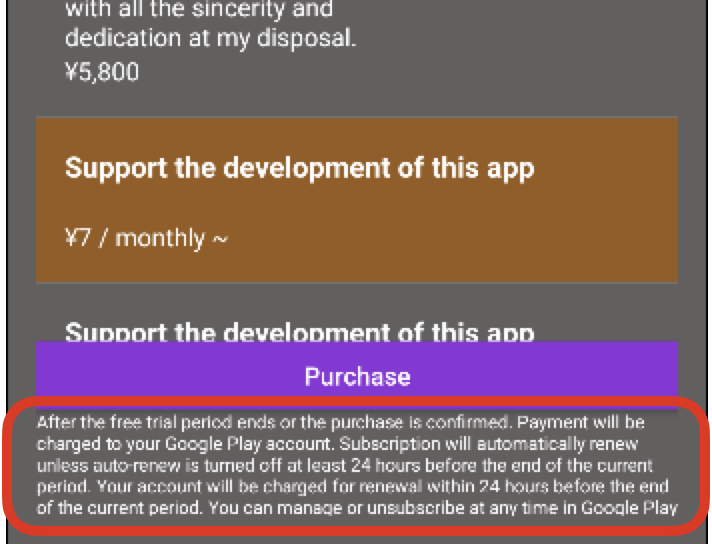
}Next is the inadequate description of the offer conditions. I am attaching an image after the pointed out response as it is easier to understand. The red framed part is the point that was considered insufficient.
In-app products
Subscriptions
Regarding this one, I understood the point, but was not sure what specific wording to write in response. The following is an excerpt from the original email in which I received the actual Reject communication.
Issue found: Violation of Subscriptions policy
Your app does not comply with the Subscriptions policy.
- Your offer does not clearly and accurately describe the terms of your trial offer or introductory pricing, including when a free trial will convert to a paid subscription, how much the paid subscription will cost, and that a user can cancel if they do not want to convert to a paid subscription.
As a solution work, we have appropriated the wording with reference to other applications. We thought it would be better to follow a proven precedent than to think about it since it seems to be almost a standard wording.
Purchase Request
Once the item has been selected from the screen, the final step is to finally purchase the item. The actual purchase screen can be called up by executing the purchase flow for the item that has been acquired.
Testing
Testing can be performed without incurring charges by logging in and running the test with the test account that was initially prepared. There are two things to keep in mind here.
- Purchase flow is executed by the app registered in the store
- Subscription-type items have their own time period.
First, the purchase flow is executed, but with a debug build of the app, an error is displayed on the purchase screen and the flow cannot be executed.
Next, for subscription-type items, when you proceed to the actual purchase screen, the payment with the test card is displayed. At this time, the renewal period is displayed on the purchase screen, but this renewal period is different from the period actually set for the item. In my case, it was displayed as 5 minutes. It seems to be a specification for the renewal behavior of subscriptions, which displays an extremely short fixed period of time. (I thought I had made a mistake and reviewed the settings for a while.)
At the end
It may seem difficult at first, but once you understand the overall picture, in-app purchases themselves can be implemented surprisingly easily by looking at official materials and other publicly available information. However, there are some pitfalls regarding subscription purchases that you may not understand until you try it, so I hope that developers who will be dealing with this issue in the future will refer to my stumbling blocks.
Thank you for your sharing. I am worried that I lack creative ideas. It is your article that makes me full of hope. Thank you. But, I have a question, can you help me?
Your article helped me a lot, is there any more related content? Thanks!
Can you be more specific about the content of your article? After reading it, I still have some doubts. Hope you can help me.
Can you be more specific about the content of your article? After reading it, I still have some doubts. Hope you can help me.
Can you be more specific about the content of your article? After reading it, I still have some doubts. Hope you can help me.
Your article helped me a lot, is there any more related content? Thanks!
I don’t think the title of your article matches the content lol. Just kidding, mainly because I had some doubts after reading the article. https://accounts.binance.com/en-ZA/register?ref=JHQQKNKN
I don’t think the title of your article matches the content lol. Just kidding, mainly because I had some doubts after reading the article.
Thanks for sharing. I read many of your blog posts, cool, your blog is very good.
I don’t think the title of your article matches the content lol. Just kidding, mainly because I had some doubts after reading the article. https://www.binance.com/en/register?ref=JHQQKNKN
Your point of view caught my eye and was very interesting. Thanks. I have a question for you.
Your article helped me a lot, is there any more related content? Thanks!
Thanks for sharing. I read many of your blog posts, cool, your blog is very good.
Thank you for your sharing. I am worried that I lack creative ideas. It is your article that makes me full of hope. Thank you. But, I have a question, can you help me?
Your article helped me a lot, is there any more related content? Thanks!
I don’t think the title of your article matches the content lol. Just kidding, mainly because I had some doubts after reading the article.
Thanks for sharing. I read many of your blog posts, cool, your blog is very good.
Thank you for your sharing. I am worried that I lack creative ideas. It is your article that makes me full of hope. Thank you. But, I have a question, can you help me?
Your article helped me a lot, is there any more related content? Thanks!
Your point of view caught my eye and was very interesting. Thanks. I have a question for you.
Thank you for your sharing. I am worried that I lack creative ideas. It is your article that makes me full of hope. Thank you. But, I have a question, can you help me?
I don’t think the title of your article matches the content lol. Just kidding, mainly because I had some doubts after reading the article.
Your article helped me a lot, is there any more related content? Thanks!
I don’t think the title of your article matches the content lol. Just kidding, mainly because I had some doubts after reading the article.
Thank you for your sharing. I am worried that I lack creative ideas. It is your article that makes me full of hope. Thank you. But, I have a question, can you help me?
Can you be more specific about the content of your article? After reading it, I still have some doubts. Hope you can help me.
Thank you for your sharing. I am worried that I lack creative ideas. It is your article that makes me full of hope. Thank you. But, I have a question, can you help me?
Your point of view caught my eye and was very interesting. Thanks. I have a question for you.
Your point of view caught my eye and was very interesting. Thanks. I have a question for you.
Your point of view caught my eye and was very interesting. Thanks. I have a question for you.
Your article helped me a lot, is there any more related content? Thanks!
маркетплейс аккаунтов аккаунты с балансом
платформа для покупки аккаунтов магазин аккаунтов социальных сетей
магазин аккаунтов социальных сетей магазин аккаунтов
площадка для продажи аккаунтов платформа для покупки аккаунтов
профиль с подписчиками купить аккаунт с прокачкой
платформа для покупки аккаунтов https://birzha-akkauntov-online.ru/
аккаунты с балансом маркетплейс аккаунтов соцсетей
биржа аккаунтов magazin-akkauntov-online.ru/
профиль с подписчиками перепродажа аккаунтов
продажа аккаунтов соцсетей https://prodat-akkaunt-online.ru/
платформа для покупки аккаунтов https://kupit-akkaunt-top.ru/
продать аккаунт маркетплейс аккаунтов
Buy Pre-made Account https://buyverifiedaccounts001.com/
Verified Accounts for Sale Account Acquisition
Sell Pre-made Account https://socialaccountsmarket2025.com/
Account Sale buyaccountsmarketplace.com
Account Catalog Account Sale
Sell accounts Verified Accounts for Sale
Website for Selling Accounts Social media account marketplace
Gaming account marketplace Account Trading Platform
Account Trading Platform https://buyaccounts001.com/
Website for Selling Accounts Account Selling Service
website for buying accounts sell pre-made account
accounts for sale verified accounts for sale
account market account market
account buying platform account selling platform
account market sell account
ready-made accounts for sale website for selling accounts
buy pre-made account buy pre-made account
sell account marketplace for ready-made accounts
database of accounts for sale accounts for sale
online account store account sale
profitable account sales buy account
account market secure account sales
sell pre-made account account catalog
sell accounts ready-made accounts for sale
marketplace for ready-made accounts accounts marketplace
account selling platform buy account
account buying platform account trading
account exchange account market
account sale online account store
account trading platform guaranteed accounts
account purchase account purchase
profitable account sales account marketplace
gaming account marketplace verified accounts for sale
sell account purchase ready-made accounts
website for selling accounts sell account
website for selling accounts account buying platform
Thank you for your sharing. I am worried that I lack creative ideas. It is your article that makes me full of hope. Thank you. But, I have a question, can you help me?
website for buying accounts account exchange service
account purchase secure account purchasing platform
sell account https://accounts-offer.org/
account catalog https://accounts-marketplace.xyz/
marketplace for ready-made accounts https://buy-best-accounts.org
find accounts for sale account market
buy pre-made account https://accounts-marketplace.live/
secure account purchasing platform accounts market
account market https://buy-accounts.space/
Thank you for your sharing. I am worried that I lack creative ideas. It is your article that makes me full of hope. Thank you. But, I have a question, can you help me?
profitable account sales https://buy-accounts-shop.pro
account acquisition https://buy-accounts.live
accounts market https://social-accounts-marketplace.live
buy pre-made account https://accounts-marketplace.online/
sell account https://accounts-marketplace-best.pro
продажа аккаунтов https://akkaunty-na-prodazhu.pro/
площадка для продажи аккаунтов https://rynok-akkauntov.top/
биржа аккаунтов https://kupit-akkaunt.xyz/
продать аккаунт https://akkaunt-magazin.online/
маркетплейс аккаунтов https://akkaunty-market.live
маркетплейс аккаунтов kupit-akkaunty-market.xyz
Your point of view caught my eye and was very interesting. Thanks. I have a question for you.
площадка для продажи аккаунтов https://akkaunty-optom.live
купить аккаунт https://online-akkaunty-magazin.xyz
продажа аккаунтов https://akkaunty-dlya-prodazhi.pro/
маркетплейс аккаунтов соцсетей https://kupit-akkaunt.online/
buy facebook profiles cheap facebook account
facebook accounts to buy buy fb account
buying facebook account buy-ad-account.top
buy facebook ads accounts https://buy-ads-account.click
buy aged facebook ads account https://ad-account-buy.top
buy a facebook ad account https://buy-ads-account.work
buy facebook account buy account facebook ads
Эта статья сочетает в себе как полезные, так и интересные сведения, которые обогатят ваше понимание насущных тем. Мы предлагаем практические советы и рекомендации, которые легко внедрить в повседневную жизнь. Узнайте, как улучшить свои навыки и обогатить свой опыт с помощью простых, но эффективных решений.
Детальнее – https://medalkoblog.ru/
facebook ad account for sale fb account for sale
buying facebook accounts https://ad-accounts-for-sale.work
old google ads account for sale https://buy-ads-account.top
Your point of view caught my eye and was very interesting. Thanks. I have a question for you.
old google ads account for sale https://buy-ads-accounts.click
buy facebook advertising accounts https://buy-accounts.click
sell google ads account https://ads-account-for-sale.top
buy google ads ads-account-buy.work
buy google ad account buy verified google ads account
google ads account buy https://buy-account-ads.work/
google ads reseller https://buy-ads-agency-account.top
sell google ads account https://sell-ads-account.click/
google ads account buy https://ads-agency-account-buy.click
fb bussiness manager https://buy-business-manager.org
old google ads account for sale buy google ads
facebook bm account buy buy-bm-account.org
buy facebook verified business account https://buy-verified-business-manager-account.org/
buy verified bm facebook https://buy-business-manager-acc.org/
buy facebook bm account https://buy-verified-business-manager.org
facebook business manager buy business-manager-for-sale.org
buy verified bm buy-business-manager-verified.org
fb bussiness manager https://buy-bm.org
buy facebook business manager account https://verified-business-manager-for-sale.org
buy verified business manager facebook https://buy-business-manager-accounts.org/
buy tiktok ad account https://buy-tiktok-ads-account.org
buy tiktok ads accounts https://tiktok-ads-account-buy.org
buy tiktok ads https://tiktok-ads-account-for-sale.org
tiktok ads account buy buy tiktok ads accounts
tiktok agency account for sale https://buy-tiktok-ad-account.org
tiktok ad accounts https://buy-tiktok-ads-accounts.org
tiktok ads account buy https://tiktok-ads-agency-account.org
tiktok agency account for sale https://buy-tiktok-business-account.org
tiktok ad accounts https://buy-tiktok-ads.org
Can you be more specific about the content of your article? After reading it, I still have some doubts. Hope you can help me.
Thank you for your sharing. I am worried that I lack creative ideas. It is your article that makes me full of hope. Thank you. But, I have a question, can you help me? https://accounts.binance.info/en/register?ref=JHQQKNKN
can i buy cheap clomiphene without prescription cost of clomiphene without prescription where can i get clomid price where buy cheap clomid pill order cheap clomid price how to get generic clomid without prescription can you buy cheap clomid without rx
Thank you for your sharing. I am worried that I lack creative ideas. It is your article that makes me full of hope. Thank you. But, I have a question, can you help me?
Facts blog you procure here.. It’s intricate to on strong quality script like yours these days. I justifiably appreciate individuals like you! Rent mindfulness!!
This is the stripe of serenity I take advantage of reading.
Thank you for your sharing. I am worried that I lack creative ideas. It is your article that makes me full of hope. Thank you. But, I have a question, can you help me?
buy zithromax 500mg generic – ciprofloxacin 500mg generic metronidazole 200mg generic
order semaglutide 14mg for sale – rybelsus 14mg generic cyproheptadine usa
Your point of view caught my eye and was very interesting. Thanks. I have a question for you.
buy domperidone 10mg generic – buy tetracycline pills flexeril us
propranolol uk – methotrexate 2.5mg cost methotrexate 2.5mg pills
amoxicillin canada – amoxil pills buy ipratropium pills for sale
azithromycin generic – order tinidazole 300mg for sale purchase nebivolol for sale
Can you be more specific about the content of your article? After reading it, I still have some doubts. Hope you can help me.
order augmentin 375mg generic – atbioinfo where to buy acillin without a prescription
buy esomeprazole paypal – anexa mate esomeprazole 40mg cheap
Your point of view caught my eye and was very interesting. Thanks. I have a question for you.
buy warfarin – coumamide losartan 25mg without prescription