Hello. I am zm soft, registered as a developer last year (end of ’23) and started releasing apps. We are also planning to release an app for developers, if you would like to check it out.
Today, I will describe how to create images to submit to PlayStore when releasing an app.
First of all
This is about my development environment and experience. My development environment is Mac. Therefore, this article assumes a Mac environment. As for my experience, I have been using Windows at work and have only recently started to use Mac in earnest. Therefore, I think that many things that Mac users take for granted are written.
- Apps I used
- Preview
This is the only basic software that is initially installed in Mac. When I searched, I found various image editing applications, but there seemed to be many paid ones. It was unclear how far I could do only with basic software, but I was not troubled particularly.
Main flow
The following flow was used to create the images.
- Capture the developed app
- Adding a description of the app
- Cutting out the necessary area
The screen to be created is a commonly seen screen where the cell phone screen is in the lower half of the screen and the app description is above it.
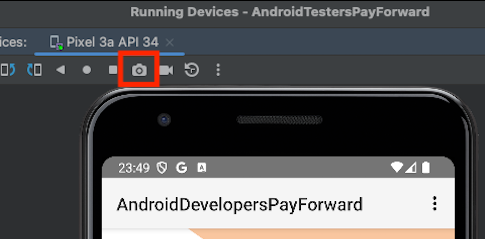
Capturing the developed app
First, take a capture using AndroidStudio’s capture function. I used AVD instead of the actual device, so I started AVD and clicked on the [Camera] symbol to take a capture.
Adding a description of the application
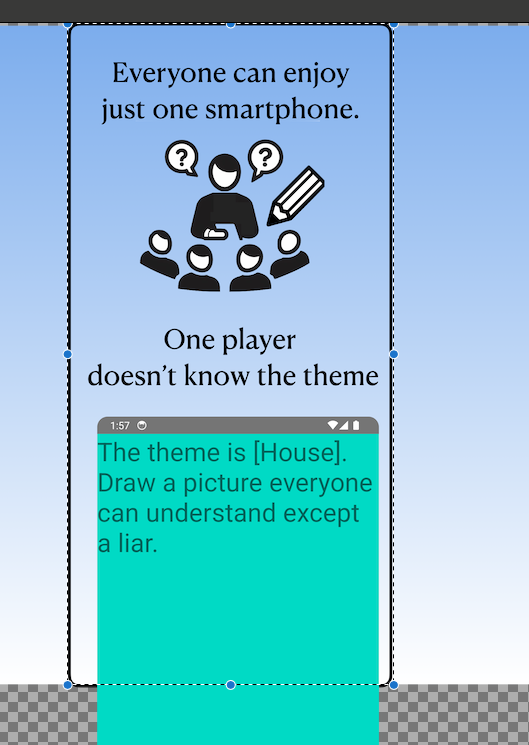
Next, add a description of the app using Keynote. In my case, I wanted to make the size consistent, so I once framed the captured image to the size of the frame, then reduced the captured image from there and added margins for adding text. The background is a gradated image because it would be lonely if it were left as it is.
The black line is the size of the captured image pasted as it is. After the border is removed, the image is scaled down to fit the captured image at the bottom of the screen.
Cutting out the necessary area
Finally, use Preview to cut the image according to the size of the frame by selecting the necessary items in Keynote, launching Previe, and selecting “New from Clipboard. At this time, there are parts of the image that are out of the necessary area, such as the background image, which can be cut from the editing menu.
As shown in the image above, select the necessary area and click [Tools]-[Cut] to cut the excess area.
Create an image of the same size
Once you have created one image in Keynote with a frame size, you can use it as a base for creating other images.

All that remains is to register the resulting image in the PlayStore.
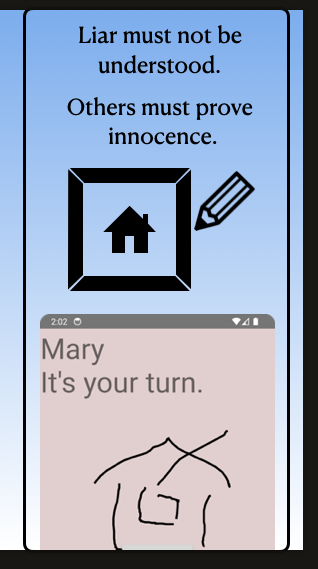
Aside: Image Image Generation Using AI
I felt that the above orthodox image alone was a little sad, so I tried to create some image images separately from the functional description of the application, and put the catch copy of the application on the result of the images. Even if you don’t have any artistic ability, it seems to be something like that.
How do you like it? This is my own way of doing things, so I’m sure there are more convenient ways to do things. If you have any recommendations, please comment.
Your point of view caught my eye and was very interesting. Thanks. I have a question for you.
Can you be more specific about the content of your article? After reading it, I still have some doubts. Hope you can help me.
Thanks for sharing. I read many of your blog posts, cool, your blog is very good. https://www.binance.com/pt-BR/join?ref=YY80CKRN
Your article helped me a lot, is there any more related content? Thanks!
Thanks for sharing. I read many of your blog posts, cool, your blog is very good.
Your article helped me a lot, is there any more related content? Thanks!
Your point of view caught my eye and was very interesting. Thanks. I have a question for you.
Can you be more specific about the content of your article? After reading it, I still have some doubts. Hope you can help me. https://accounts.binance.com/en-IN/register?ref=UM6SMJM3
Can you be more specific about the content of your article? After reading it, I still have some doubts. Hope you can help me.
Your point of view caught my eye and was very interesting. Thanks. I have a question for you.
Thank you for your sharing. I am worried that I lack creative ideas. It is your article that makes me full of hope. Thank you. But, I have a question, can you help me?
Can you be more specific about the content of your article? After reading it, I still have some doubts. Hope you can help me.
Thank you for your sharing. I am worried that I lack creative ideas. It is your article that makes me full of hope. Thank you. But, I have a question, can you help me?
Thank you for your sharing. I am worried that I lack creative ideas. It is your article that makes me full of hope. Thank you. But, I have a question, can you help me?
I don’t think the title of your article matches the content lol. Just kidding, mainly because I had some doubts after reading the article.
Your article helped me a lot, is there any more related content? Thanks!
Thank you for your sharing. I am worried that I lack creative ideas. It is your article that makes me full of hope. Thank you. But, I have a question, can you help me?
Can you be more specific about the content of your article? After reading it, I still have some doubts. Hope you can help me.
Your point of view caught my eye and was very interesting. Thanks. I have a question for you.
[url=https://tradeogre.shop/]TradeOgre[/url] is an online cryptocurrency exchange launched in 2018, providing a straightforward platform for buying, selling, and trading various digital assets.
Your point of view caught my eye and was very interesting. Thanks. I have a question for you. https://accounts.binance.com/ES_la/register?ref=T7KCZASX
Your article helped me a lot, is there any more related content? Thanks!
I don’t think the title of your article matches the content lol. Just kidding, mainly because I had some doubts after reading the article.
Can you be more specific about the content of your article? After reading it, I still have some doubts. Hope you can help me.
I don’t think the title of your article matches the content lol. Just kidding, mainly because I had some doubts after reading the article.
аккаунты с балансом аккаунт для рекламы
купить аккаунт купить аккаунт
аккаунты с балансом маркетплейс аккаунтов соцсетей
продать аккаунт аккаунт для рекламы
биржа аккаунтов маркетплейс аккаунтов
продать аккаунт купить аккаунт
услуги по продаже аккаунтов профиль с подписчиками
услуги по продаже аккаунтов купить аккаунт
покупка аккаунтов продать аккаунт
гарантия при продаже аккаунтов аккаунт для рекламы
профиль с подписчиками marketplace-akkauntov-top.ru/
маркетплейс аккаунтов биржа аккаунтов
маркетплейс аккаунтов соцсетей продажа аккаунтов соцсетей
покупка аккаунтов маркетплейс аккаунтов соцсетей
маркетплейс аккаунтов аккаунт для рекламы
маркетплейс аккаунтов https://pokupka-akkauntov-online.ru/
Database of Accounts for Sale Guaranteed Accounts
Sell accounts https://accountsmarketplacepro.com
Account Trading Guaranteed Accounts
Profitable Account Sales Account Acquisition
Guaranteed Accounts Website for Buying Accounts
Account Selling Platform Account Buying Platform
Website for Buying Accounts Accounts market
Account Catalog Account marketplace
Buy and Sell Accounts Accounts marketplace
Sell Account https://socialmediaaccountsale.com/
account purchase account buying platform
profitable account sales account catalog
account selling platform profitable account sales
account exchange secure account purchasing platform
buy pre-made account guaranteed accounts
sell account secure account purchasing platform
find accounts for sale online account store
account marketplace socialaccountsshop.com
account marketplace buy pre-made account
online account store secure account purchasing platform
buy accounts buy pre-made account
account exchange guaranteed accounts
accounts marketplace sell accounts
gaming account marketplace account trading platform
accounts for sale account buying platform
buy accounts sell accounts
buy account accounts for sale
guaranteed accounts accounts marketplace
account catalog buy and sell accounts
accounts marketplace account store
account selling platform account market
guaranteed accounts secure account purchasing platform
secure account sales guaranteed accounts
website for selling accounts account trading
buy pre-made account account buying platform
Maximisez votre plaisir avec Inventonslemondedapres, le comparateur qui révèle les casinos en ligne les plus performants !
account purchase accounts marketplace
website for selling accounts https://accounts-marketplace.xyz
account exchange https://social-accounts-marketplaces.live/
sell accounts https://accounts-marketplace.live
account trading platform social-accounts-marketplace.xyz
account catalog https://buy-accounts.space/
website for selling accounts https://buy-accounts-shop.pro
social media account marketplace https://buy-accounts.live
Avec Inventonslemondedapres, identifiez facilement les casinos en ligne qui correspondent exactement à vos attentes !
account exchange service https://accounts-marketplace.online/
account selling service account market
profitable account sales https://accounts-marketplace-best.pro
продажа аккаунтов https://akkaunty-na-prodazhu.pro
маркетплейс аккаунтов https://rynok-akkauntov.top/
маркетплейс аккаунтов https://kupit-akkaunt.xyz/
маркетплейс аккаунтов соцсетей https://akkaunt-magazin.online
маркетплейс аккаунтов https://akkaunty-market.live
площадка для продажи аккаунтов https://kupit-akkaunty-market.xyz
магазин аккаунтов https://akkaunty-optom.live
биржа аккаунтов online-akkaunty-magazin.xyz
магазин аккаунтов akkaunty-dlya-prodazhi.pro
маркетплейс аккаунтов https://kupit-akkaunt.online
buy facebook profiles https://buy-adsaccounts.work
buy facebook accounts https://buy-ad-accounts.click
facebook accounts for sale https://buy-ad-account.top
buy aged facebook ads accounts https://ad-account-buy.top
buy fb account https://buy-ads-account.work
buy fb ads account https://ad-account-for-sale.top
В этом обзорном материале представлены увлекательные детали, которые находят отражение в различных аспектах жизни. Мы исследуем непонятные и интересные моменты, позволяя читателю увидеть картину целиком. Погрузитесь в мир знаний и удивительных открытий!
Углубиться в тему – https://medalkoblog.ru/
Your point of view caught my eye and was very interesting. Thanks. I have a question for you.
buy aged fb account buy facebook ads manager
cheap facebook advertising account https://ad-accounts-for-sale.work
buy google ads verified account https://buy-ads-account.top
google ads accounts for sale https://buy-ads-accounts.click
buy google ads agency account https://ads-account-for-sale.top
buy google ad account https://ads-account-buy.work
buy aged google ads account https://buy-ads-invoice-account.top
google ads accounts for sale buy-account-ads.work
buy aged google ads account buy google ads agency account
google ads accounts sell-ads-account.click
buy google ads threshold account https://ads-agency-account-buy.click/
facebook business manager for sale buy-business-manager.org
buy adwords account adwords account for sale
fb bussiness manager https://buy-bm-account.org/
fb bussiness manager buy facebook business manager accounts
buy facebook verified business account https://buy-verified-business-manager.org/
buy facebook bm https://buy-business-manager-acc.org
buy verified facebook https://business-manager-for-sale.org
buy fb bm https://buy-business-manager-verified.org
verified bm for sale verified bm for sale
buy facebook bm account https://verified-business-manager-for-sale.org/
facebook business account for sale buy-business-manager-accounts.org
buy tiktok ad account https://buy-tiktok-ads-account.org
buy tiktok business account https://tiktok-ads-account-buy.org
buy tiktok ads accounts https://tiktok-ads-account-for-sale.org
buy tiktok ads account https://tiktok-agency-account-for-sale.org
tiktok ad accounts https://buy-tiktok-ad-account.org
Medicine information. Cautions.
can i order generic actos
All trends of medicines. Read now.
buy tiktok ads account https://tiktok-ads-agency-account.org
buy tiktok business account https://buy-tiktok-business-account.org
tiktok ads account for sale https://buy-tiktok-ads.org
where to buy generic clomid pill cost of generic clomiphene prices buy generic clomid price cost of generic clomiphene for sale can i purchase cheap clomiphene without rx where to get clomid pill order generic clomiphene without a prescription
The depth in this ruined is exceptional.
More posts like this would make the blogosphere more useful.
where to buy rybelsus without a prescription – periactin 4mg brand brand cyproheptadine 4mg
how to buy motilium – cheap tetracycline buy cyclobenzaprine 15mg generic
brand inderal 10mg – methotrexate 2.5mg pill methotrexate 5mg generic
Thanks for sharing. I read many of your blog posts, cool, your blog is very good.
amoxil order online – ipratropium sale buy combivent 100mcg sale
Pills information leaflet. Drug Class.
where to buy generic mesalamine no prescription
Everything about medicament. Get now.
zithromax 250mg drug – buy generic bystolic over the counter buy nebivolol 20mg generic
cheap augmentin – https://atbioinfo.com/ ampicillin antibiotic
Your point of view caught my eye and was very interesting. Thanks. I have a question for you.
Thank you for your sharing. I am worried that I lack creative ideas. It is your article that makes me full of hope. Thank you. But, I have a question, can you help me?
buy esomeprazole 20mg without prescription – https://anexamate.com/ nexium drug
buy coumadin 2mg – https://coumamide.com/ buy losartan generic
Thanks for sharing. I read many of your blog posts, cool, your blog is very good.